Appointment
Appointment Sheet>Appointment
This screen is accessed from the Appointment Sheet by double-clicking on an existing appointment, which opens the screen with the patient's details,
or double-clicking an empty slot on the appointment sheet, which will open this screen ready for data entry.
Available functions include:
- Create a New Appointment
- Check in Patient
- Review Scheduling and Payer Alerts on a Patient
- Verify Insurance Eligibility, Real Time
- Cancel Appointment
- Reinstate an Appointment
- Create a Pending Appointment
- Retrieve/Schedule Pending Appointments
- Scheduling/Appointment Conflicts
- Duplicate Appointment Warning
- Enter Amount Due DOS
- Enter Amount Collected DOS & Corresponding Reference #
Create a New Appointment
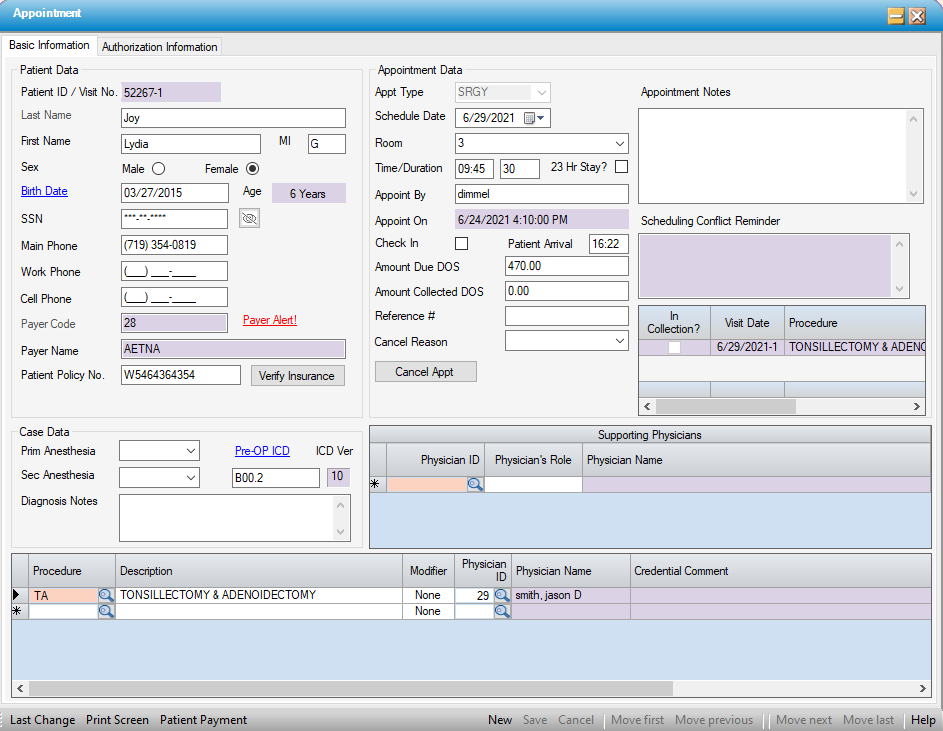
Appointment Basic Information Tab
Double-click the desired time slot on the appointment sheet. The desired time will be highlighted on the left, and the Appointment form will open ready for data entry.
Enter the required fields (as indicated by the red error balls): Last Name, First Name, and Duration.
- If the Procedures are also entered at this time, and the Appointment Type Configuration is set to pull the duration from either Preference Card or Procedure Configuration, the Duration will auto-populate or override manual entry but can be edited.
-
Enter any other available information (demographics, insurance, appointment notes, etc.).
-
Save
NOTE: For self-pay patients, leave Payer Code, Payer Name, and Patient Policy No. blank. There is no need to enter data in any of these fields. The moment a visit is scheduled, the system assumes that there will be charges associated with that visit and designates the visit as self-pay. It will remain in self-pay status (Payer 1) until another payer is added. Manually entering "self-pay" in these fields may prevent the visit from being enabled for the entry of charges in the Charge Entry form!
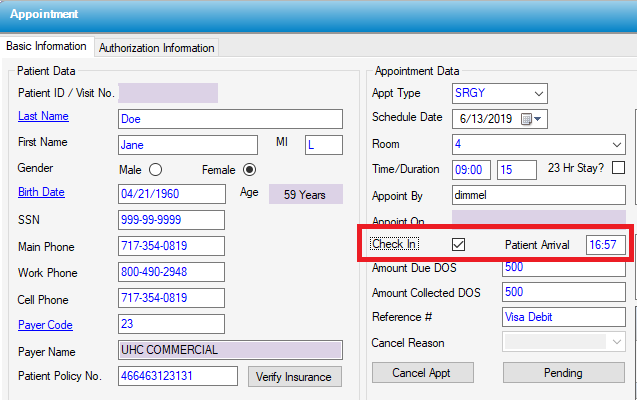
Check in Patient
-
Retrieve patient appointment by double clicking on the Appointment on the Appointment Sheet.
-
Select the Check In box. HST Practice Management will automatically insert the patient's arrival time as the current time when the patient is checked in, but it can also be manually entered.
-
Save
Review Alerts on an Appointment
Retrieve patient appointment.
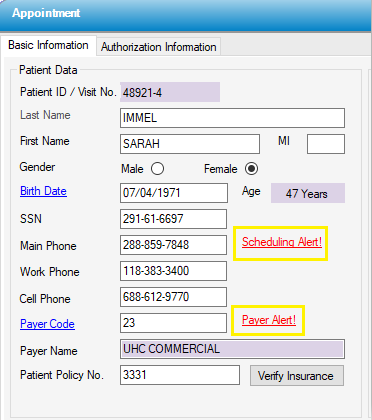
If a Scheduling Alert has been created in Patient Demographics, a red hyperlink will be visible indicating that there is a Scheduling Alert!:
Click on the Scheduling Alert! hyperlink and a pop-up will display the alert that was entered in Case > Registration > Patient Demographics.


If a Payer Alert has been created in Payer Configuration, a red hyperlink will be visible indicating that there is a Payer Alert!:
Click on the Payer Alert! hyperlink and a pop-up will display the alert that was entered in Payer > Payer Configuration Overview.


The Scheduling Conflict Reminder will indicate conflicts such as overlapping appointments or one piece of equipment, such as a C-Arm, being scheduled in more than one room at the same time.

The Credential Comment section of the scheduling grid will indicate whether a physician’s credentialing has expired or whether a procedure has been scheduled for which the physician selected has no Preference Card. Warning messages specific to HST eChart include ‘No Chart Template’ and ‘No Physician Orders’ when these fields are missing within Physician Preference card set up.

NOTE: For Resource Conflicts and Credentialing Comments, Center Configuration > Scheduling tab can be set to 1 – Do not check, 2 – Warn, or 3 – Not allowed. If set to 3 – Not allowed, the Appointment can only be saved when the conflict has been resolved.
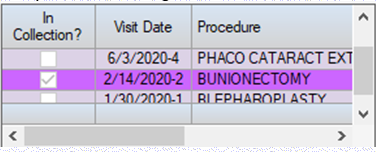
The previous visits grid: In Collection? will also indicate if a previous visit(s) has been a assigned to Collections. The box in this column will be checked and that visit will be highlighted in violet in the grid.
Verify Insurance Eligibility from the Appointment in Real Time
If contracted with a clearinghouse that supports Real Time Eligibility (currently only Waystar offers this function), click on the  button when scheduling a case. The clearinghouse will return a response showing whether or not the patient is eligible.
Cancel Appointment
Retrieve patient appointment
Select the Cancel Reason from the drop-down.
Click  .
.
Confirm the cancellation by clicking "Yes"
A pop-up screen will provide the option of retaining the visit information for rescheduling purposes.
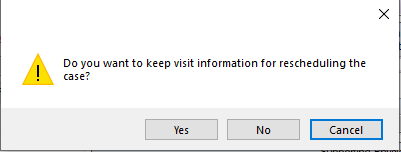
Click "Yes" to retain the patient and visit information to reinstate the appointment at a later date.
NOTE: There is a check box in Center Configuration > Scheduling tab to Always Retain Visit For Cancel Appointment. If this has been checked, this step will not be required.
Reinstate Appointment
When rescheduling a previously canceled appointment, use the patient lookup. If HST Practice Management finds a prior canceled visit for this person, the Canceled Visits grid will pop-up, from which the appointment can be reinstated by clicking the grey box to the left of the previous date.
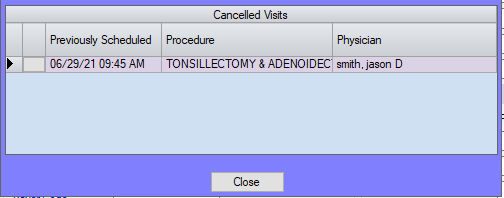
If the Previously Scheduled visit is not relevant, simply close this form and proceed with scheduling a new visit.
Canceled appointments can be viewed on the SC1001 - Cancelled Appointments report.
Create Pending Appointment
If Center has been configured to allow pending appointments, cases can be scheduled as Pending, to be finalized at a later date. To do so, enter the basic patient and case information and hit the  button. The case information will be stored without creating an actual appointment or visit.
Retrieve/Schedule Pending Appointments
To review, retrieve, and schedule appointments that have been flagged as Pending, Click on Scheduling menu and click on Pending Appointments. 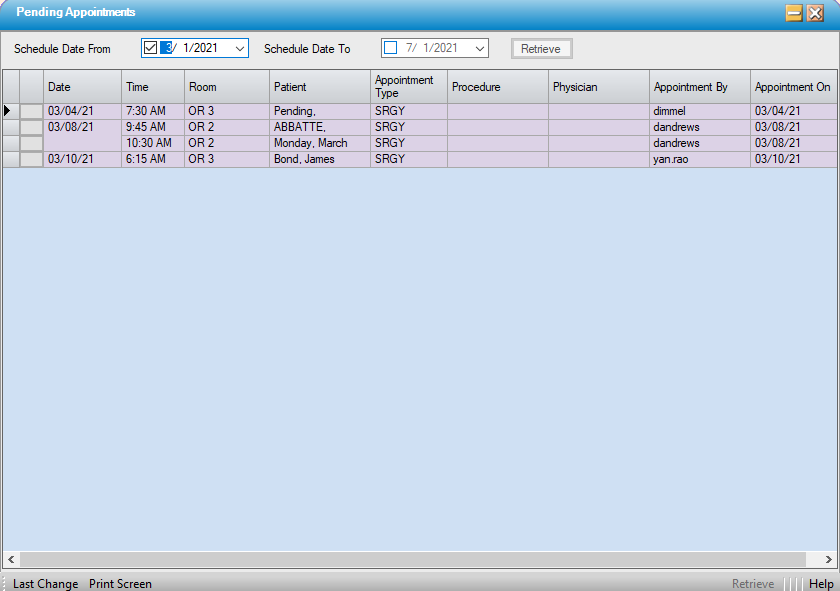
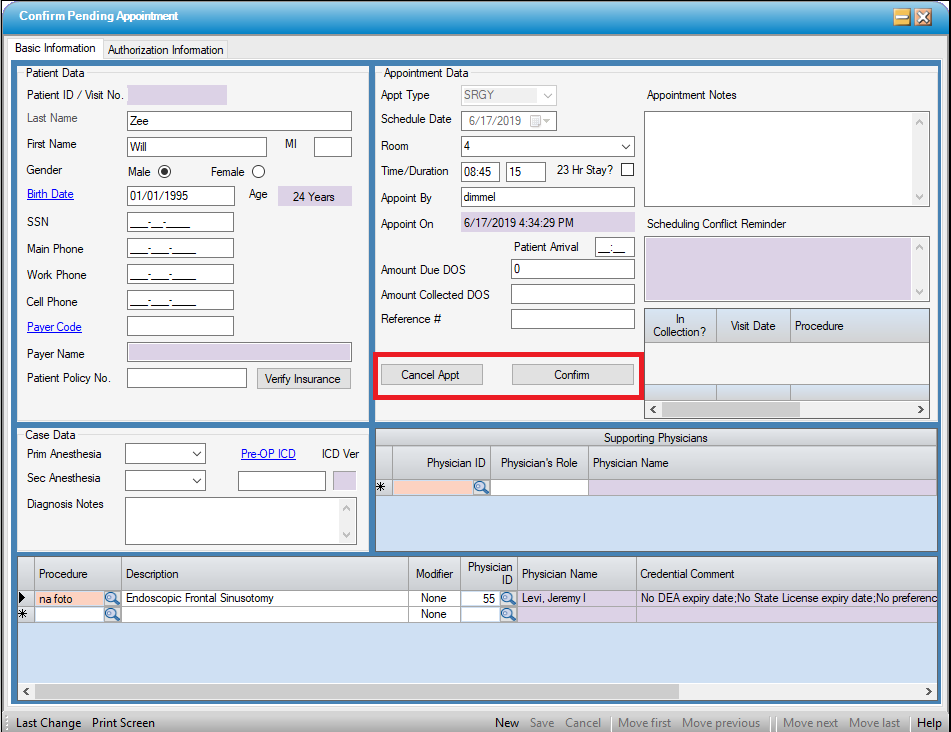
To schedule a pending case, click on the gray block at the left of the row. The appointment will open on the date and time previously entered. These entries can be edited. Select Confirm to schedule the case.
To cancel or delete an appointment that is currently pending, select as above and hit the button. There will be a prompt to confirm (no cancel reason is required).
NOTE: The Appointment Sheet must be open prior to opening pending appointments and attempting to Confirm or Cancel a pending appointment.
Payments
The Amount Due DOS field will indicate the amount the patient is expected to pay at the time of service. If an estimate was created using the Practice Management Patient Estimator, this field will populate directly from the Patient Estimate.
The Amount Collected DOS field can be completed to indicate how much was collected from the patient on or prior to the date of service, and it is followed by a Reference field in which the method of payment can be recorded.

If the center is contracted with Waystar, and Patient Payments has been enabled in Center Configuration, select Patient Payment on the left side of the navigation tool bar to open the Collection Terminal in Waystar Patient Payments to collect debit card, ACH, or credit card payments, set up auto drafts, or record over the counter payments for reconciliation purposes. Users must be logged into Waystar prior to selecting Patient Payments in order for the Collections Terminal to open directly from Practice Management.

The SC1000 - Admission Billing Schedule can be printed prior to checking in patients to review the amount to be collected for each patient, and then printed again at the end of the day with the Show Collection Information box checked to review both the dollar amount and percent collected for those patients and the total dollar amount and percent collected for the day.
Authorization Information Tab
The Authorization Information Tab provides the ability to enter authorization information provided by the surgeon's office, prior to confirming this information with the Payer.
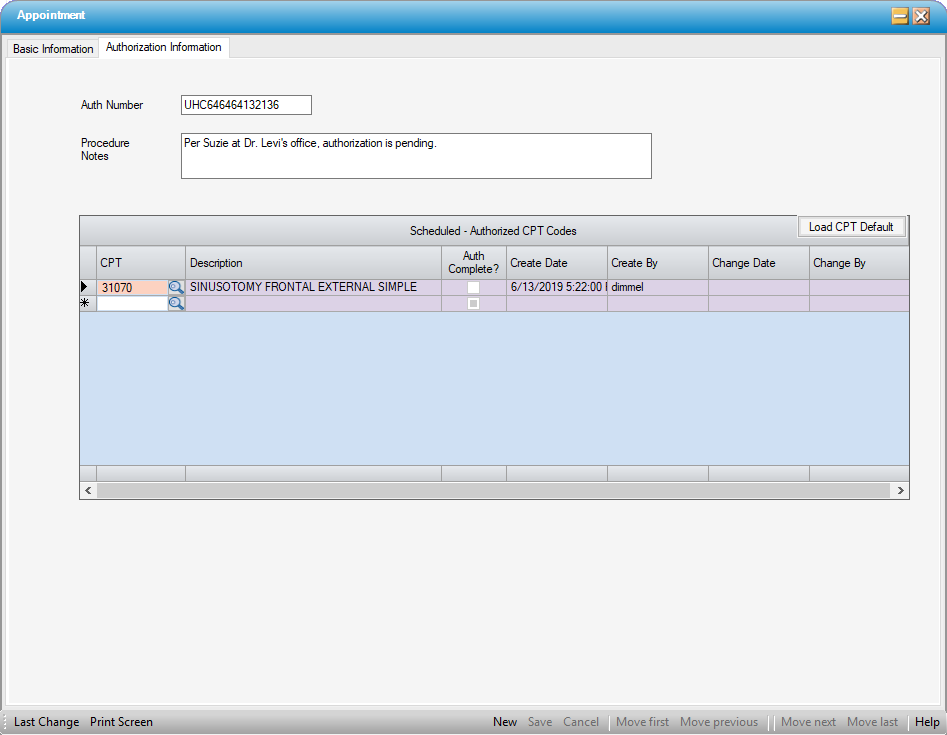
Enter the Auth Number, if received.
Enter any notes received from the surgeon's office regarding the authorization.
Enter the requested or authorized codes in the Scheduled-Authorized CPT Codes grid. Codes can be entered by selecting  to load CPT codes entered in Procedure Configuration, by manually typing in the codes, or by using the magnifying glass to conduct a search.
NOTE: Any information entered in this tab, will populate in the Authorization Info tab in Registration > Insurance as well.
Appointment Conflicts
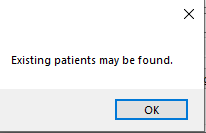
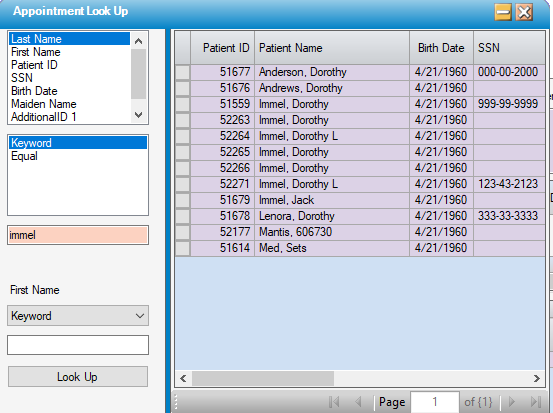
HST Practice Management will give warnings upon finding several types of conflicts. If it finds a match between patient name or DOB entered on a new appointment, a pop-up screen will display the existing patient(s). To select the patient it has found and pull existing demographics, click on the grey block to retrieve. If the patient is not a duplicate (such as when it's the same DOB but a different patient), simply "X" out of the warning window and proceed with data entry.
HST Practice Management will also warn of equipment conflicts based on Item Master equipment availability.
Duplicate Appointment Warning
If HST Practice Management detects that a patient who already has an appointment on that same date is being scheduled again, a yellow warning will display in the Scheduling Conflict Reminder area. At this point either "X out" to discard the information entered already, or proceed to schedule the case if a second visit is truly desired.