Enter a Payment
Enter a single payment
Click  New on the navigation bar or right click and select New.
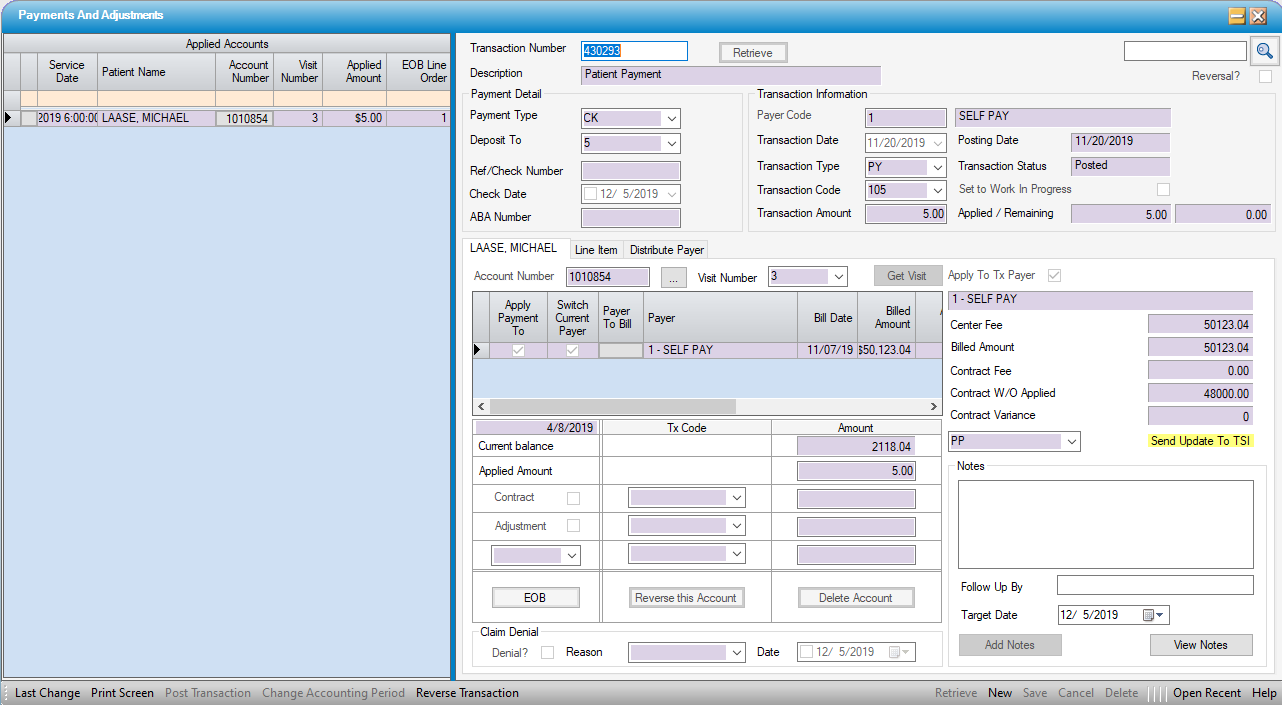
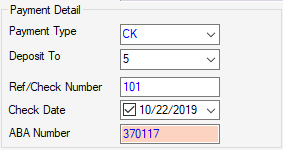
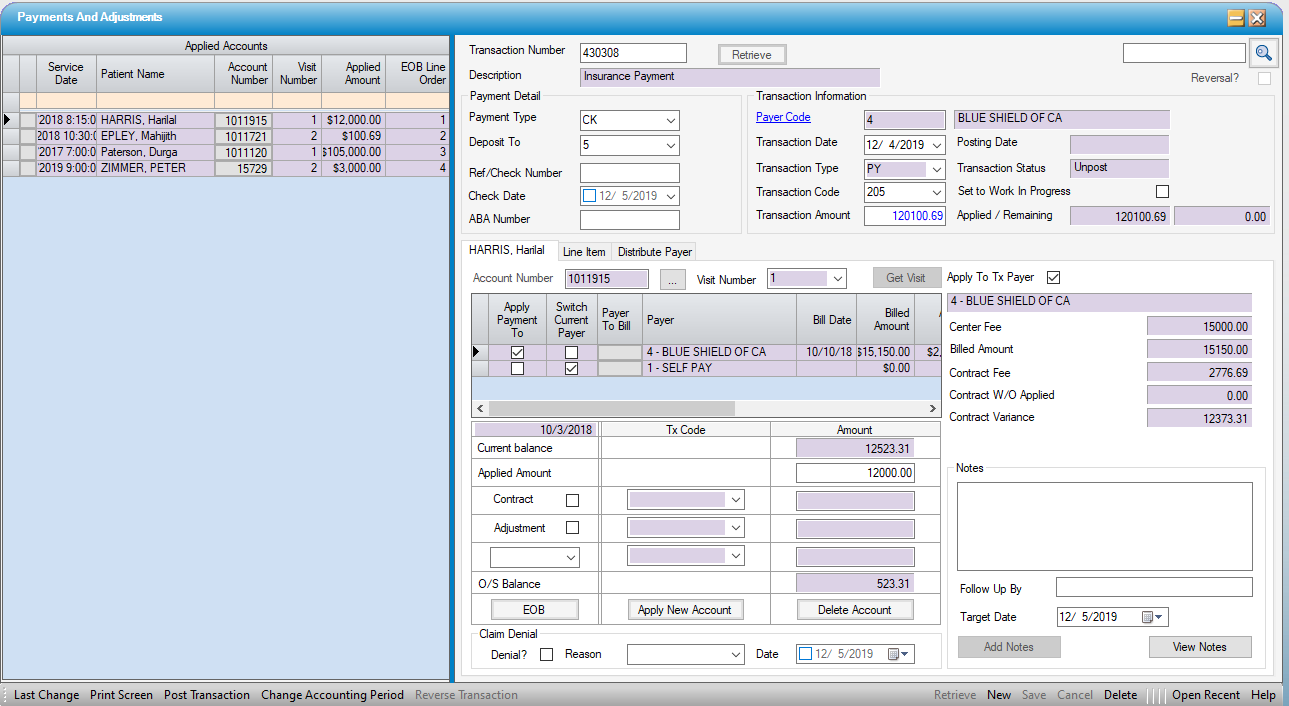
Payment Detail section:
- Choose the Payment Type (i.e.: Cash, Check, Credit Card, EFT, Money Order, Other)
- Select Deposit To (Optional). For facilities that have more than one Bank Account to which payments are deposited, this is a Center Table that is built and maintained by the center via Administration > Code Table Maintenance
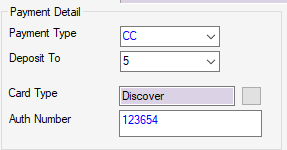
- Enter Ref/Check Number, Check Date, and ABA Number (routing number) if desired. These are optional fields. If CC- Credit Card was selected, this field will change to Card Type and a drop down will appear that is mapped to the Credit Card Type Enterprise Code Table and a field to enter the Authorization Number from the credit card terminal will replace the Check Date and ABA Number fields. (This is also a table that is built and maintained by the client, though it may be controlled at the Enterprise rather than the Center level.)
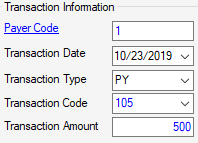
Transaction Information section:
- Enter a Payer Code or use the blue hyperlink
 to search by Name, Payer Code, Address Line 1, or Zip Code.
 - Transaction Date will default to the current date but can be edited via manual entry or by utilizing the drop down calendar.
- Transaction Type will default to PY - Payment but can also be edited via manual entry or by utilizing the drop down.Payer Configuration Overview
- Enter the Transaction Amount. (For even dollar amounts, it is not necessary to enter a decimal point and zeros.)
The right side of the form is primarily read only:
- The name of the Payer will populate when the Payer Code is entered.
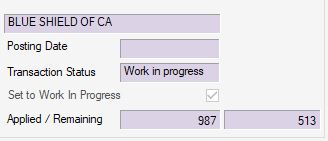
- Posting Date will populate when the transaction is posted.
-
Transaction Status will indicate one of the following:
- Unposted - Transaction balances, but has not yet been posted.
- Work In Progress - Transaction is out of balance (Transaction Amount and Applied Amount(s) do not match) or user has set to Work In Progress by manually checking the box to prevent the transaction from being posted prior to completion.
- Posted - Transaction has been posted.
-
Set to Work In Progress check box will be checked and read only if a transaction is out of balance, but user can also manually check this box to prevent a transaction from being posted prior to completion.
- Applied/Remaining: The first field is for the amount applied and will populate with the Transaction Amount entered. The second field will populate with the difference between the Transaction Amount and the Applied Amount. (Remaining must be zero in order to post the transaction.)
Select the patient by entering the Account Number and Visit Number, then clicking  , or invoke the Patient Account Look Up by clicking on the
  hyperlink. (The ellipsis to the right of the account number
  is also a hyperlink that will invoke the Patient Account if research is required prior to entering the payment.)
NOTE: When the account number is entered, the Visit Number will default to the most recent visit. If the payment is for a previous visit, enter the correct visit number or select from the drop down.
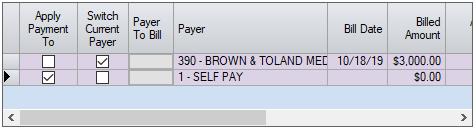
- The grid will display all payers for the Visit selected.
- The box in the Apply Payment To column will reflect the Payer Code entered in Transaction Information if that payer is listed on the visit.
- The box in the Switch Current Payer column will indicate the current payer.
- To switch the balance to the next payer (i.e.: secondary, tertiary, self-pay) after applying the current payment, check the box next to that payer. If a secondary or subsequent payer needs to be billed (claim did not cross over from the primary), select the grey function key in the Payer To Bill column. (For additional instruction on secondary billing, please reference the Secondary Billing help file.)
- The remaining columns on the grid are read only and are for informational purposes. Move the scroll bar to the right to view the additional columns.
-
 .
.
NOTE: If the payer from whom the payment was received is not on the patient account (example: a secondary insurance payment is received due to Medicare crossover, but facility had no record of secondary payer), select the  check box. This will override the Apply Payment To selections and the payment will be recorded as having been received from the Payer entered on the transaction.
- The Current balance for the visit selected will populate as a read only field.
- Enter the Applied Amount. For a single payment, this should be equal to the Transaction Amount previously entered.
- If the Contract W/O was applied at the time of charge entry or when a previous payment was posted, the amount will be reflected on the right side of the form as Contract W/O Applied. If not previously entered, click the check box for Contract.
- The Tx Code will populate with the default Contractual Write Off code entered in Payer Configuration. If none was entered or a different code is needed, the correct code can be manually entered or selected from the drop down.
- If there is a Contract Fee entered for the case, the Amount will default to the Billed Amount minus the Contract Fee (minus Contract W/O applied if incomplete transactions were previously posted). If there is no Contract Fee associated with the case, the write off amount can be entered manually.
- If any additional Adjustments are required (such as a Medicare sequestration or small balance write off) , check the Adjustment box.
- Enter or select the appropriate Tx Code.
- Enter the Amount to be adjusted.
- If any additional Contract W/O or Adjustments are required (see example below), select either AD-Adjustment or CW-Contractual Write Off on the third row.
Enter or select the appropriate Tx Code.
- Enter the Amount to be adjusted.
- Example:
- Medicare write-off is entered as Contract.
- Medicare sequestration is entered as Adjustment.
- Remaining balance is less than center's small balance threshold, so AD is selected with Small Balance Tx Code and remaining balance is entered for adjustment.
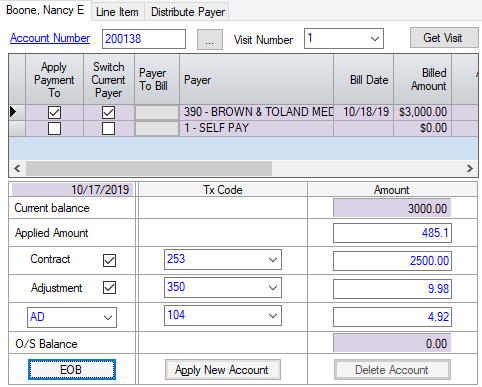
Note that the O/S Balance updates as each Transaction Amount is entered.
To enter a claim denial:
- Check the Denial? check box
- Enter or select a denial reason. (This is an Enterprise Code Table, maintained by the center or enterprise administrator.).
- Manually enter the date denied or select from pop-up calendar (will default to current date).

Click  Save
Save
- The patient's record is displayed in the Applied Accounts grid on the left
- The transaction is available for posting via the Transaction Posting form, or on the screen, if user permissions allow.
The right side of the form is primarily read only:
- Apply To Tx Payer check box, as previously indicated, can be checked if the payer from which the payment has been received is not listed on the Visit.
- Name of Payer for which the Apply Payment To box is checked will populate, unless Apply To TX Payer has been checked, in which case the name of the Payer selected in Transaction Information will populate.
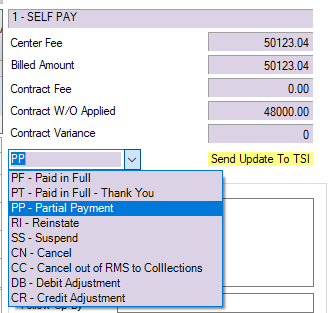
- Center Fee will populate with total Center Fee from Charge Entry/Patient Account > Billed Payers tab.
- Billed Amount will populate with total Billed Amount from Charge Entry/Patient Account > Billed Payers tab.
- Contract Fee will populate with total Contract Fee from Charge Entry/Patient Account > Billed Payers tab.(The Contract Fee is calculated based upon the Payer Contract selected in Registration > Insurance.)
- Contract W/O Applied will populate with sum of contractual write-offs previously applied; whether at time of Charge Entry or previously posted in Payments and Adjustments.
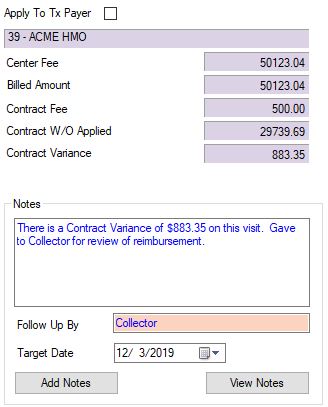
- Contract Variance will populate with any discrepancies between the total Contract W/O Applied (including the current transaction) and the Billed Amount minus the Contract Fee. (The Contract Variance should serve as a flag for a review of reimbursement.)
- If a center has contracted for the TSI Revenue Management feature in HST Practice Management and is posting a payment to a visit that has been assigned to TSI, an alert will appear, highlighted in yellow: Send Update To TSI. There will also be a drop down to select the status of the payment that is being posted and transmitted (i.e.: PP - Partial Payment, PF - Paid in Full, etc.) To report a payment, make the relevant selection from the drop down, then go to Billing > Revenue Management to transmit the batch when payment posting has been completed.
Notes can be entered directly from the Payment And Adjustments form without having to open View Notes. Simply type note in the free text field, enter Follow Up By and Target Date if desired, and select  . (Target Date will default to current date, but can be edited by manually entering a date or selecting from the drop down calendar.)
Back to Payments and Adjustments
Enter a Bulk Payment
Click  New on the navigation bar , or right click and select New.
- Choose the Payment Type(i.e.: Cash, Check, Credit Card, EFT, Money Order, Other)
- Select Deposit To (Optional). For facilities that have more than one Bank Account to which payments are deposited, this is a Center Table that is built and maintained by the center via Administration > Code Table Maintenance.
- Enter Ref/Check Number, Check Date, and ABA Number (routing number) if desired. These are optional fields. If CC- Credit Card was selected, these fields will change to Card Type with a hyperlink to the Credit Card Type Enterprise Code Table and a field to enter the Authorization Number from the credit card terminal. (This is also a table that is built and maintained by the client, though it may be controlled at the Enterprise rather than the Center level.)
-
Choose the Payer Code
- Enter a Payer Code or use the blue hyperlink
 to search by Name, Payer Code, Address Line 1, or Zip Code.
 -
Transaction Date will default to the current date but can be edited via manual entry or by utilizing the drop down calendar.
-
Transaction Type will default to PY - Payment but can also be edited via manual entry or by utilizing the drop down.
-
The Transaction Code will populate based upon the Transaction Type and the default codes entered in Payer Configuration for the payer and transaction type selected, but this too can be edited via manual entry or by utilizing the drop down. If no default transaction codes, were entered in Payer Configuration, enter manually or select from drop down.
- Enter the full Transaction Amount: the amount of the total payment.
The right side of the form is primarily read only:
- The name of the Payer will populate when the Payer Code is entered.
- Posting Date will populate when the transaction is posted.
-
The Transaction Status will indicate one of the following:
- Unposted - Transaction balances, but has not yet been posted.
- Work In Progress - Transaction is out of balance (Transaction Amount and Applied Amount(s) do not match) or user has set to Work In Progress by manually checking the box to prevent the transaction from being posted prior to completion.
- Posted - Transaction has been posted.
-
Set to Work In Progress check box will be checked and read only if a transaction is out of balance, but user can also manually check this box to prevent a transaction from being posted prior to completion.
- Applied/Remaining: The first field is for the amount applied and will populate with the Applied Amount entered. The second field will populate with the difference between the Transaction Amount and the Applied Amount. (Remaining must be zero in order to post the transaction.)
-
Select the patient by entering the Account Number and Visit Number, then clicking  , or invoke the Patient Account Look Up by clicking on
-
Verify the Apply Payment To Payer Code and correct if necessary.
- If Payer from which payment was received is not listed on the visit, checking the Apply To Payer check box will ensure that the Payer selected is the Payer that will be reflected on the Patient Account for this transaction.
- Switch to Current Payer check box as needed.
- Enter the Applied Amountfor that visit as well as any corresponding Contract write offs or adjustments.
Click  .
.
- The patient's record is displayed in the Applied Accounts grid on the left.
- The Applied Amount and Remaining Amounts are updated (to the right of the Transaction Amount)
- The Patient Name section is ready for a new record.
Select the next patient
Continue this process until the entire Transaction Amount is applied.
Click Save
- Save can be selected before the entire amount is applied and continue later or simply selected throughout the data entry process as a safeguard.
- The Transaction Status will remain as "Work in Progress" until the entire amount is applied and Remaining amount is zero.
- The transaction is available for posting via the Transaction Posting form or on screen, if permissions allow.
Back to Payments and Adjustments
Enter a multi-payer payment
If separate Payers have been created in HST Practice Management for large commercial plans, such as BCBS PPO vs. BCBS HMO or BCBS POS, but the payments are combined on a single remittance, follow the instructions for entering a bulk payment as above. HST Practice Management will apply the payment to the Payer entered on the transaction, but "apply to transaction payer" can be selected for the record to reflect the Payer on the visit.
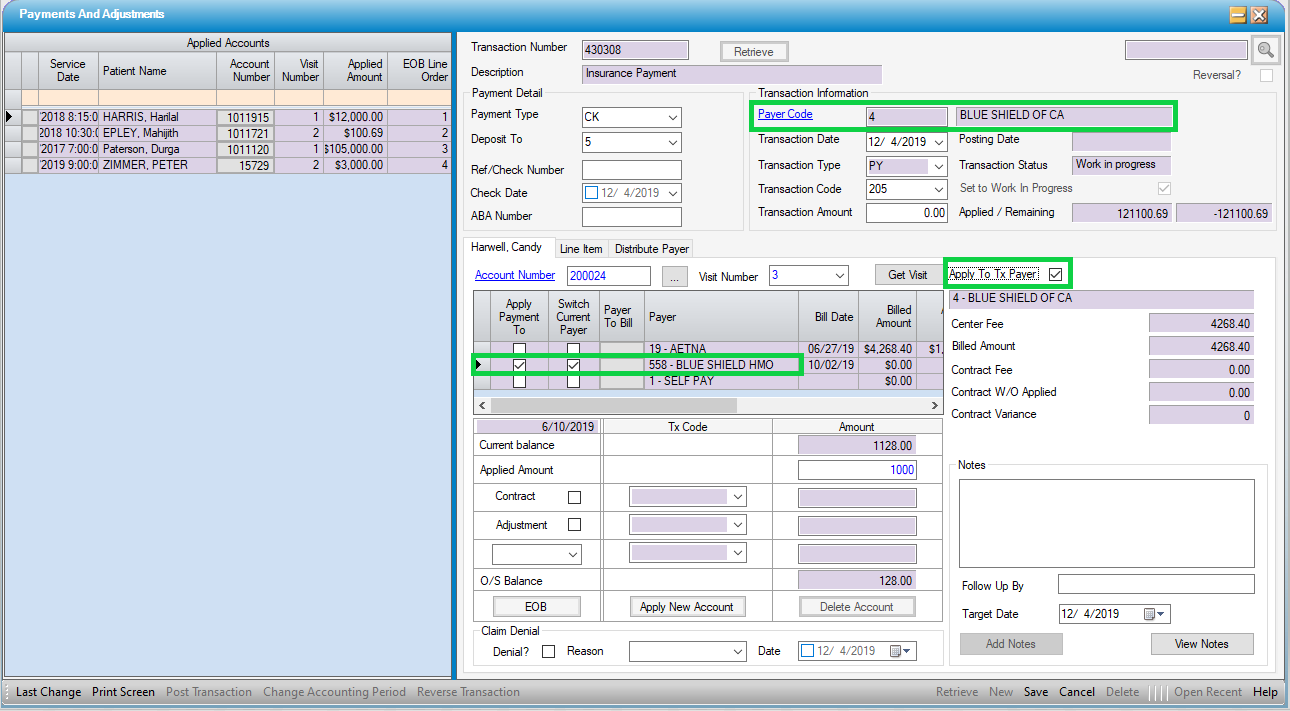
.
Back to Payments and Adjustments
As indicated by the form name, Payments and Adjustments is not just for posting Payments. Additional Transaction Types that can be entered in this form include:
- CW - Contractual Write Off
- BD - Bad Debt
- FC- Finance Charge
- AD - Adjustment
- AC - Additional Charge
- RF - Refund
Bulk Self Pay Transactions can also be utilized for all but CW - Contractual Write Off and PY - Payments.
EOB Information
If a secondary payer will be billed electronically, the required adjudication information can be entered directly from the Payments And Adjustments form by selecting the  function.
The patient and payer names will display. If the EOB is out of balance, a red error ball will appear and the totals for payments and adjustments will also be red. .

Once any discrepancies in the data entry are resolved, the error ball will no longer be visible, and the totals will be black.
For claims with a single line item, entries can be made directly in the Claim Adjustments grid. For line item adjudication posting, click on the  by each line item to open individual claim adjustment grids.
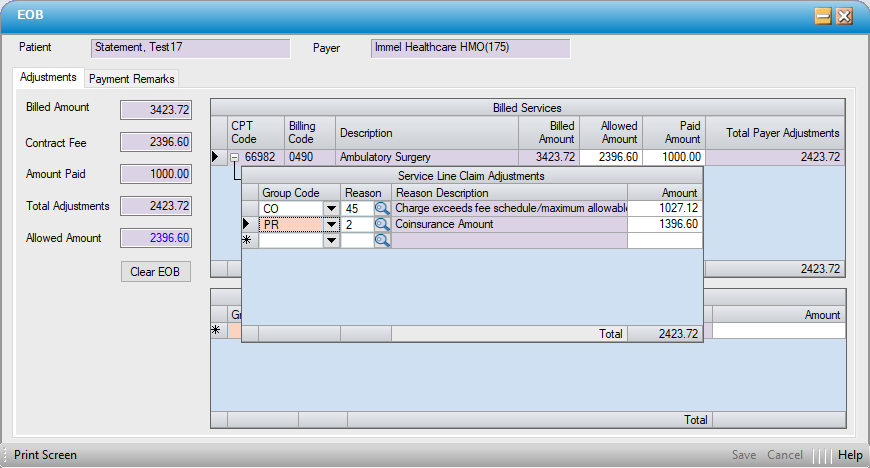
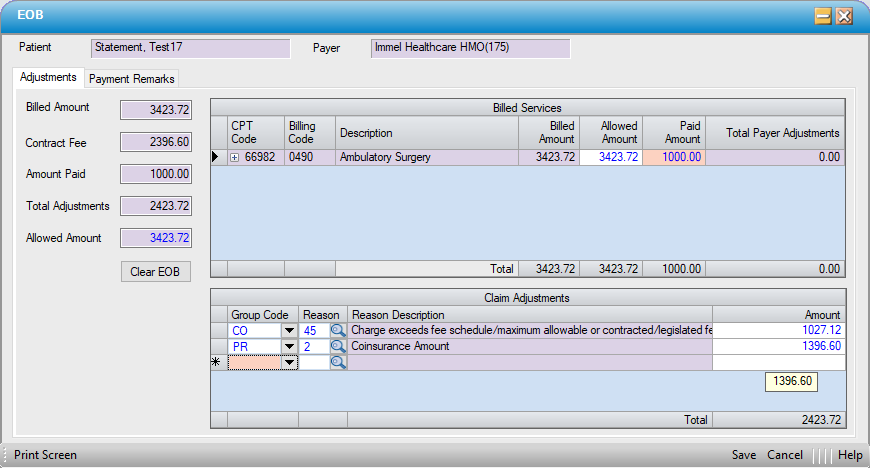
Enter EOB Adjustment Information
Billed Services
Generally when a remittance is received, the Payer adjudicates the claim on a CPT/Service Line level.
The CPT codes that were billed out to a payer can be viewed on the Billed Services grid. The Allowed and Paid Amounts per CPT code can be copied directly from an EOB. If Electronic Remittance Advice - Payer was utilized to import payments, these fields will populate automatically.
NOTE: The sum of Amount Paid for all Billed Services lines must be equal to the Total Amount Paid by the Payer.
Total Payer Adjustments column is the sum of Claim Adjustments.
To enter in Payer Adjustments for individual line items, click the sign next to the CPT code.

Enter the Group Code, Reason and Amount for each service line that the paper remit or ERA has listed for the CPT Code.
For Example:
CO - 45 $2783.64
PR – 2 $1000.00
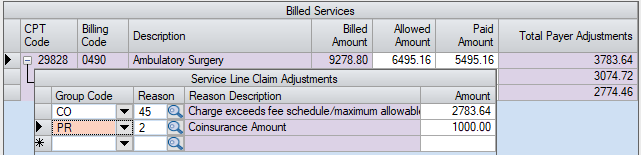
When done entering in the Claim Adjudication for a service line click – (minus) sign next to the CPT Code to close the Service Line Claim Adjustments form for that line.
Once all the adjudication is entered for all services lines click the  Save button.
Claim Adjustments
Sometimes a Payer will have a Claim Level adjustment that does not tie into any service line, there is only one service line, or there is only claim level adjudication.
To enter in a Claim Level adjustment, follow the same steps as above, but simply enter the information on the Claim Adjustments grid.

Enter Payment Remarks
If Remarks were included on an imported ERA, these can be seen on the Payment Remarks tab. The Payment Remarks table is hard coded and cannot be changed or edited, it is an ANSI X12 Standard for all Electronic Formats, 837 I, 837P, and 835 (ERA). Remarks can be selected when posting manually, however, by using the magnifying glass to search for the appropriate code in this table.
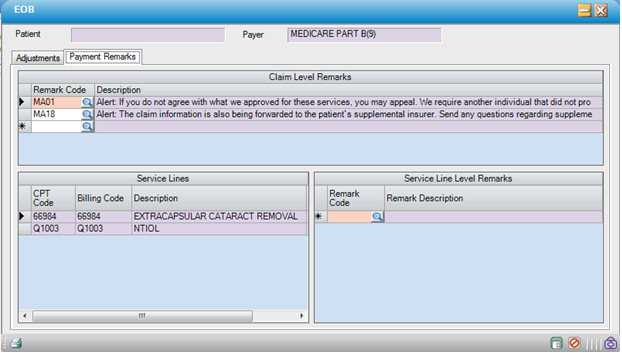
Select a Remark Code for each applicable line. Click Save
Correct/Clear EOB Information
If it is necessary to correct or clear the EOB information entered on an already-posted payment, use the  button to delete the prior values.