Payment Plan Tab
Billing > Patient Account > Payment Plan
The payment plan tab in the Patient Account allows the facility to record and monitor payment plans that have been established with patients by providing the means to record the visits included in a payment plan, the number of payments to which the patient has agreed, and the amount of each monthly payment. If the starting payment balance is not evenly divisible by the number of payments selected, the system will also calculate how much will be due for the final payment.
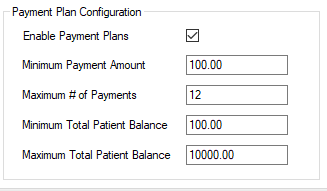
The Enable Payment Plans check box must be selected in Administration > Configuration > Center Configuration > Center tab in order for this tab to be available for utilization. At that time, center administration can also set up a minimum payment amount, maximum number of payments, minimum total patient balance (starting balance), and maximum total patient balance.
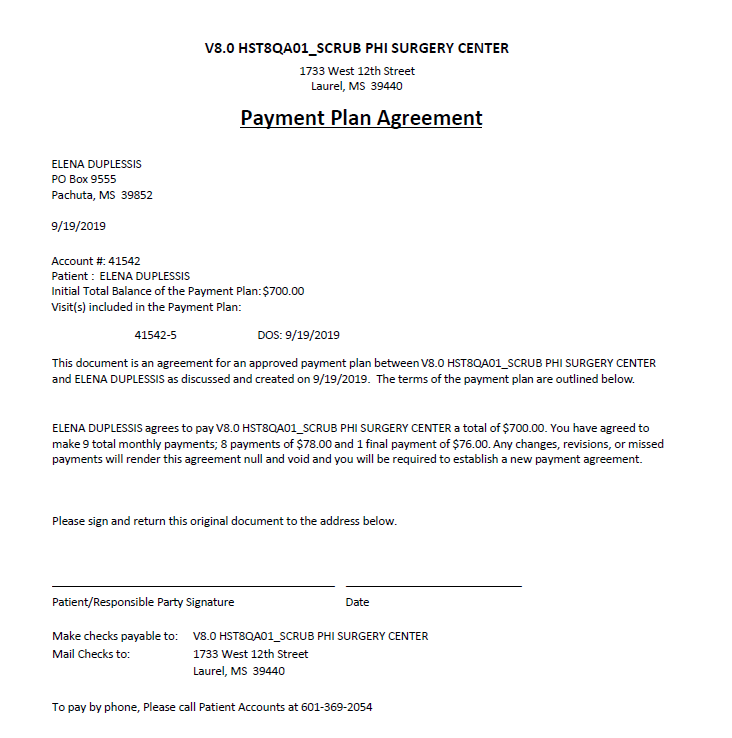
Once the payment plan has been established, a Payment Plan Agreement can also be printed directly from the Payment Plan tab for the patients to sign.
.png)
Setting up a Payment Plan
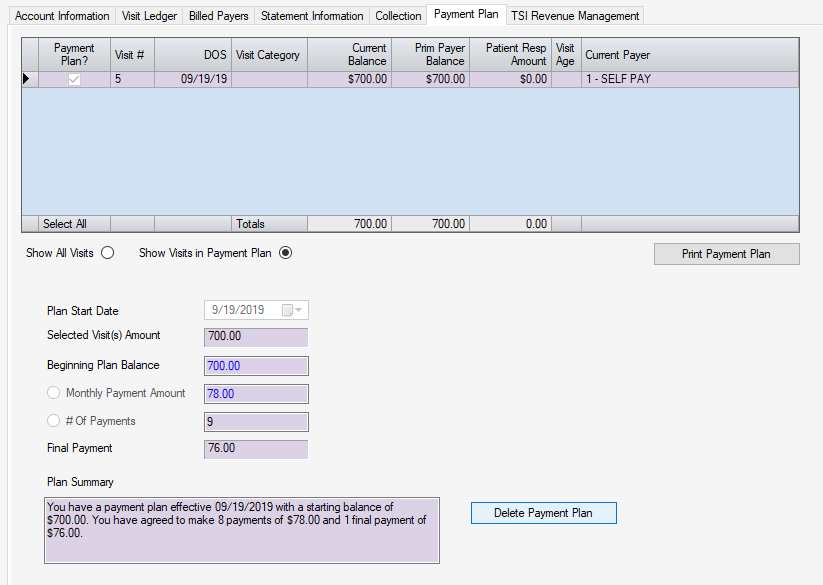
When the Payment Plan tab is opened in the Patient Account, the tree view on the left will display all the visits for the account entered. Note in the example above that the colors in the tree view do indicate that Visit 4 is in Collections. Consequently, only Visit 5 was selected for the current Payment Plan.
- To select visits to be included in the Payment Plan, check the box next to that visit in the Payment Plan? column.
- The Payment Plan start date will default to the current date but can be edited by manually entering a date or selecting from the pop-up calendar.
- Tab to the Beginning Plan Balance amount and the Selected Visit(s) Amount box will calculate the total self-pay balance for those visits selected. (Current and upcoming visits can be selected, even though there are no charges yet.)
- Payment plans can be set up one of two ways:
- Select the Monthly Payment Amount radio button and enter the amount the patient has agreed to pay each month. The system will calculate the # of Payments.
- Select the # of Payments radio button and enter the number of payments the patient has agreed to make. The system will calculate the Monthly Payment Amount.
- Select the
 function and the system will create the Payment Plan and display a plan summary indicating the agreed upon terms:
 - Plan effective date
- Starting balance
- Number of payments
- Monthly Payment Amount
- Final payment if starting balance is not evenly divisible by the number of payments or monthly payment amount entered.
NOTE: As in the example provided, when the starting balance is not evenly divisible by the monthly payment amount, the system will also break the number of payments into the number that are equally divisible and then add 1 more payment for the final payment. In this example, therefore, there are 8 payments of $78.00 and 1 payment of $76.00 for a total of 9 payments.
Once a Payment Plan has been established, the Payment Plan Agreement can be printed by selecting the  function. (This document can also be printed from the Reports menu: OP5033 - Payment Plan Agreement.)
To view visits that have already been set up in a Payment Plan, select the Show Visits in Payment Plan radio button.
Note that the  is a dynamic function that changes to
  once the plan has been established. To remove a payment plan, select this function. To make changes to an existing payment plan (adding new visits, editing the Monthly Payment Amount, editing the # of Payments), the existing plan must be deleted and a new plan established.
OP5034 - Active Payment Plans can be run from the reports menu for tracking payment status on visits on which Payment Plans have been established.